Hey there! As a supplier of Solar Street Lights With Arm, I'm super excited to walk you through the installation process of these nifty lights. Solar street lights with arms are a great addition to any outdoor space, offering both functionality and energy efficiency. So, let's dive right in!
Step 1: Site Selection
The first thing you gotta do is pick the right spot for your solar street light. You want a place that gets plenty of sunlight throughout the day, 'cause that's how the solar panel charges up. Avoid areas that are shaded by trees, buildings, or other structures. Also, make sure the ground is level and stable enough to support the light pole. A good spot could be along a sidewalk, in a parking lot, or near a playground.
Step 2: Gather Your Tools
Before you start the installation, you'll need to gather some tools. You'll typically need a shovel for digging the hole, a level to make sure the pole is straight, a wrench to tighten the bolts, and a drill if you need to make any holes. It's also a good idea to have a friend or two to help you out, especially when it comes to lifting the pole.
Step 3: Dig the Hole
Once you've found the perfect spot, it's time to dig the hole for the light pole. The size of the hole will depend on the size of the pole, but generally, it should be about 2 - 3 feet deep and wide enough to comfortably fit the base of the pole. Make sure the sides of the hole are straight and the bottom is level. You can use the level to check this as you go.
Step 4: Install the Pole
Now comes the fun part - installing the pole. Carefully lower the pole into the hole, making sure it's centered and straight. Use the level to double - check that the pole is perfectly vertical. Once it's in place, start filling the hole with concrete. You can use a pre - mixed concrete bag for this. Make sure to follow the instructions on the bag for the right water - to - concrete ratio. As you pour the concrete, use a trowel to smooth it out and remove any air bubbles. Let the concrete set for at least 24 hours before proceeding.
Step 5: Attach the Arm
After the concrete has set, it's time to attach the arm to the pole. The arm is what holds the solar panel and the light fixture. Most arms come with pre - drilled holes that align with the holes on the pole. Use the bolts and nuts provided to secure the arm to the pole. Make sure to tighten the bolts firmly using a wrench, but don't over - tighten them as this could damage the parts.
Step 6: Install the Solar Panel
Next, you'll install the solar panel on the arm. The solar panel usually has a mounting bracket that attaches to the arm. Line up the bracket with the holes on the arm and use the bolts to secure it in place. Make sure the solar panel is facing south (in the northern hemisphere) or north (in the southern hemisphere) to get the maximum amount of sunlight. You can use a compass to check the direction.
Step 7: Connect the Wires
Now it's time to connect the wires. There are usually three main wires: one from the solar panel, one from the battery, and one to the light fixture. First, connect the wire from the solar panel to the charge controller. The charge controller regulates the amount of power going from the solar panel to the battery. Then, connect the wire from the charge controller to the battery. Make sure to connect the positive and negative wires correctly. Finally, connect the wire from the battery to the light fixture. Double - check all the connections to make sure they're secure.
Step 8: Install the Light Fixture
Once the wires are connected, it's time to install the light fixture. The light fixture usually attaches to the end of the arm. Line up the holes on the fixture with the holes on the arm and use the bolts to secure it. Make sure the light is pointing in the right direction, usually downwards to illuminate the area below.
Step 9: Test the Light
After everything is installed, it's time to test the light. Wait until it gets dark, and the light should automatically turn on. If it doesn't, check the connections again to make sure everything is properly connected. You may also need to adjust the settings on the charge controller if necessary.


Step 10: Final Checks
Once the light is working, do a final check of the installation. Make sure the pole is still straight and the arm is securely attached. Check the tightness of all the bolts and make sure there are no loose wires. You can also take a look at the solar panel to make sure it's clean and free of any debris.
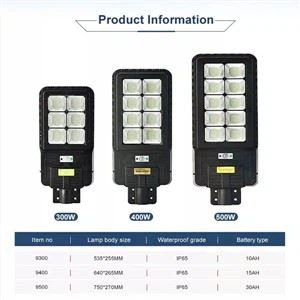
If you're interested in high - quality solar street lights, we have some great options available. Check out our High Quality Outdoor Waterproof IP65 300W 400W 500W Solar Street Lights. These lights are built to last and are suitable for a variety of outdoor applications. We also have Solar Street Light with Pole if you're looking for a complete package. And for those who prefer an integrated design, our Solar Integrated Street Light Using Lithium Iron Phosphate Battery LiFePO4 is a great choice.
If you're thinking about purchasing solar street lights with arms for your project, don't hesitate to reach out. We're here to help you with any questions you may have and to guide you through the selection process. Whether you're a contractor working on a large - scale project or a homeowner looking to light up your driveway, we've got the right solution for you.
References
- "Solar Lighting Handbook" - A comprehensive guide on solar lighting systems and installation.
- Manufacturer's manuals for solar street lights and related components.