How to Replace the Battery of a Straight Solar Street Light
As a trusted supplier of straight solar street lights, I often receive inquiries about maintaining and replacing components of these energy - efficient lighting solutions. One of the most common concerns is how to replace the battery of a straight solar street light. In this blog, I'll guide you through the process step - by - step, ensuring that your solar street lights continue to function optimally.
Understanding the Importance of Battery Replacement
The battery is a crucial part of a solar street light system. It stores the energy collected by the solar panel during the day and releases it to power the light at night. Over time, batteries will degrade, and their capacity will reduce. A degraded battery can lead to dimmer lights or even the failure of the light to turn on. Therefore, timely battery replacement is essential to maintain the performance of your solar street lights.


Tools Required for Battery Replacement
Before you start the battery replacement process, make sure you have the following tools on hand:
- A pair of insulated gloves to protect yourself from electrical shocks.
- A wrench or screwdriver set that matches the type of fasteners used in your solar street light.
- A multi - meter to check the voltage and state of charge of the old and new batteries.
Step 1: Safety First
Safety should always be your top priority. Switch off the power supply to the solar street light. Although solar street lights are generally low - voltage systems, it's still a good practice to avoid any potential electrical hazards. Wear your insulated gloves throughout the replacement process.
Step 2: Locate the Battery
Straight solar street lights typically have their batteries located within a compartment. This compartment can sometimes be at the base of the light pole or within the light fixture itself. Use your wrench or screwdriver to open the access panel, being careful not to damage any surrounding components.
Step 3: Disconnect the Old Battery
Once you've opened the access panel, you'll see the battery connected to the wiring system. Most solar street light batteries use a simple plug - and - play or screw - terminal connection. Gently disconnect the wires from the old battery. Make a note of how the wires are connected, as you'll need to replicate this when installing the new battery.
Before removing the old battery completely, use your multi - meter to check the battery's voltage and state of charge. This information can be useful for assessing the battery's condition and for future reference.
Step 4: Remove the Old Battery
After disconnecting the wires, carefully lift out the old battery from the compartment. Be aware that some batteries can be quite heavy, so use proper lifting techniques to avoid injury.
It's important to dispose of the old battery properly. Batteries contain chemicals that can be harmful to the environment if not disposed of correctly. Check with your local waste management facility for guidelines on battery recycling or disposal.
Step 5: Select the Right Replacement Battery
When choosing a new battery for your straight solar street light, consider the following factors:
- Voltage: Ensure that the voltage of the new battery matches the requirements of your solar street light system. Mismatched voltage can lead to system failure.
- Capacity: The battery capacity, usually measured in ampere - hours (Ah), determines how long the light can stay on at night. Select a battery with a capacity similar to or greater than the old one to maintain or improve the light's performance.
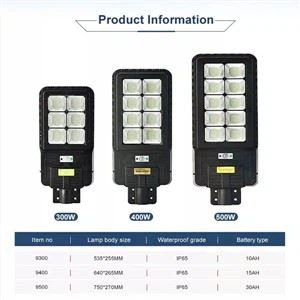
As a supplier, we offer a range of high - quality batteries suitable for our Solar Light 40 Watt IP65 Waterproof Outdoor Features, Automatic Cleaning Self - cleaning Solar Street Lights, and Led Street Light 15 Watt. Our batteries are designed to be reliable and long - lasting, ensuring that your solar street lights operate efficiently.
Step 6: Install the New Battery
Place the new battery into the compartment. Make sure it fits securely and is properly aligned. Reconnect the wires to the new battery, following the notes you made when disconnecting the old battery. Double - check the connections to ensure they are tight and secure.
Step 7: Test the System
After installing the new battery, close the access panel. Switch on the power supply to the solar street light. Use your multi - meter to check the voltage across the battery and the output of the solar panel. Also, observe the light at night to ensure that it turns on and functions as expected.
Tips for Long - Term Battery Maintenance
- Regular Inspections: Periodically check the battery connections for tightness and the battery for signs of corrosion or damage.
- Avoid Over - Discharging: Most modern solar street light controllers have built - in protection against over - discharging. However, it's still important to ensure that the light is not over - used, as this can shorten the battery's lifespan.
- Temperature Management: Batteries perform best within a certain temperature range. If possible, install the solar street light in an area where the battery is not exposed to extreme temperatures.
Conclusion
Replacing the battery of a straight solar street light is a relatively straightforward process, as long as you follow the proper steps and take the necessary safety precautions. By replacing the battery in a timely manner and maintaining it properly, you can extend the lifespan of your solar street light system and ensure that it continues to provide reliable lighting.
If you are in the market for high - quality straight solar street lights or need further assistance with battery replacement and maintenance, we are here to help. We have a professional team with extensive experience in the field of solar lighting solutions. Contact us to discuss your specific requirements, and we'll work with you to find the best products and services for your project.
References
- "Solar Lighting Handbook" by ABC Publications
- Industry standards on solar street light battery maintenance and replacement.